write_tet
我们的目标是从houdini输出生成的四面体,希望是tetgen格式的。
众所周知,houdini是不能直接输出四面体的。
有三方案去解决:
- 输出点云ply文件,然后利用tetgen生成网格。
- 输出Hounidi内置的.geo格式文件,然后写个脚本去解析json,因为这个文件就是个json。
- 直接从Houdini中利用Python节点输出tetgen格式。
我探索并试验了以上所有三种方案。优缺点如下:
第一种方案的缺点是四面体是不可控的,因为是tetgen现生成的。
第二种方案的缺点是你要保证geo里面没有多余的数据。例如还存储的颜色或uv等信息,或者houdini的prim上还存了其他信息,就会导致解析失败。当然我们可以使用clean节点清除掉这些多余信息。我会把脚本放到文末。
第三种方案是最好的。可控性最好。因此后面我们会说这种方法。
tetgen的数据格式
我们首先要介绍一下tetgen的数据格式:
我们需要其中三种:
.node结尾代表顶点位置
.ele结尾代表四面体编号
.face结尾代表三角形编号
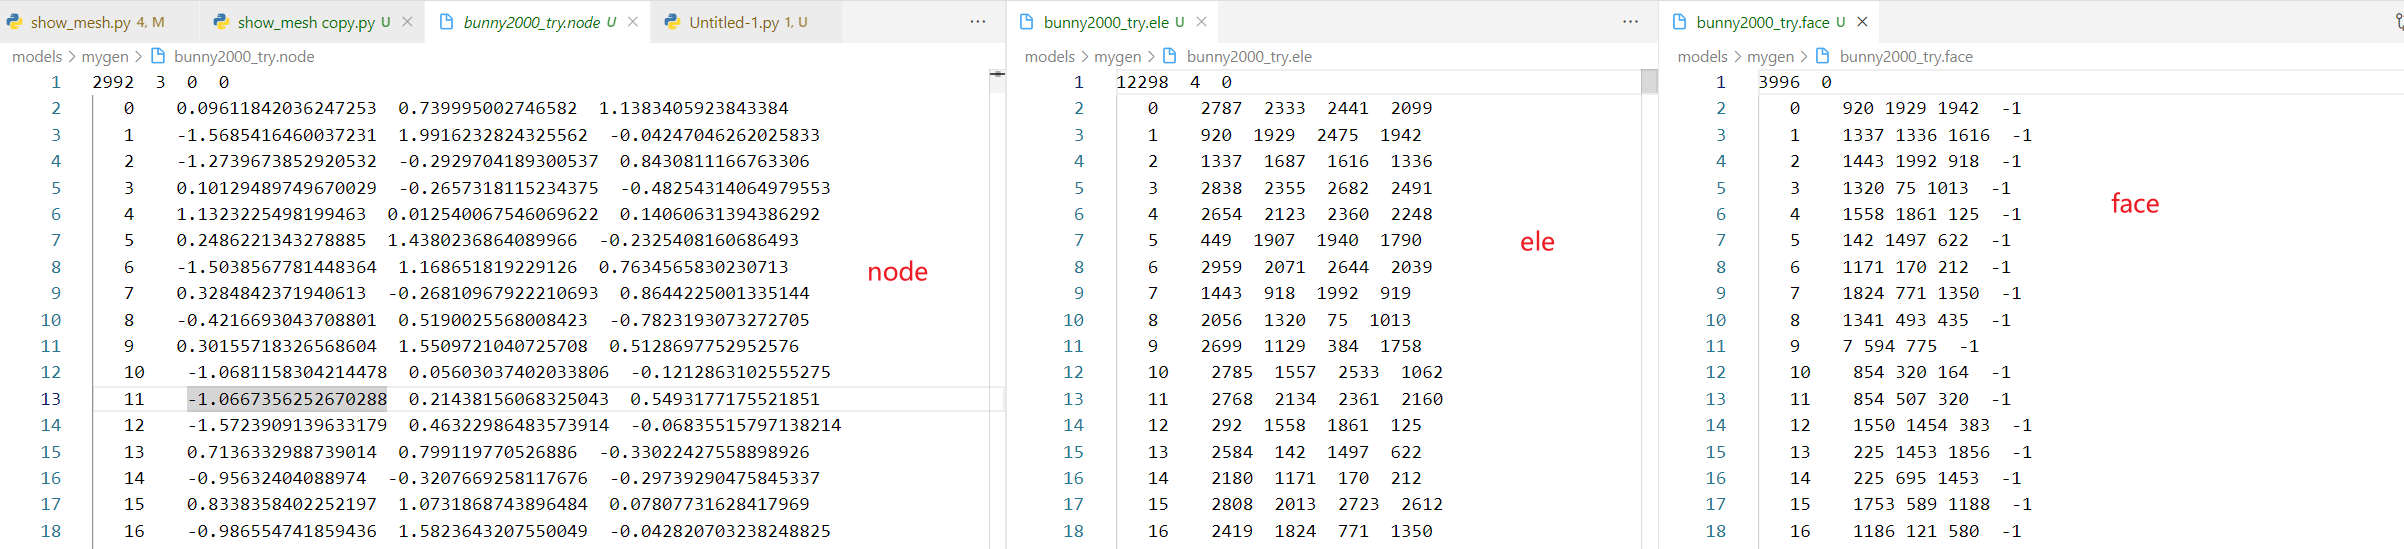 如图,其中第一个数代表点/面/单元的数量
ele和face中的顶点编号对应的都是node中点前面那个编号。
例如ele中每一行为: 当前单元的编号 四面体第1个顶点的编号 四面体第2个顶点的编号 四面体第3个顶点的编号 四面体第4个顶点的编号
Houdini中使用python节点写出
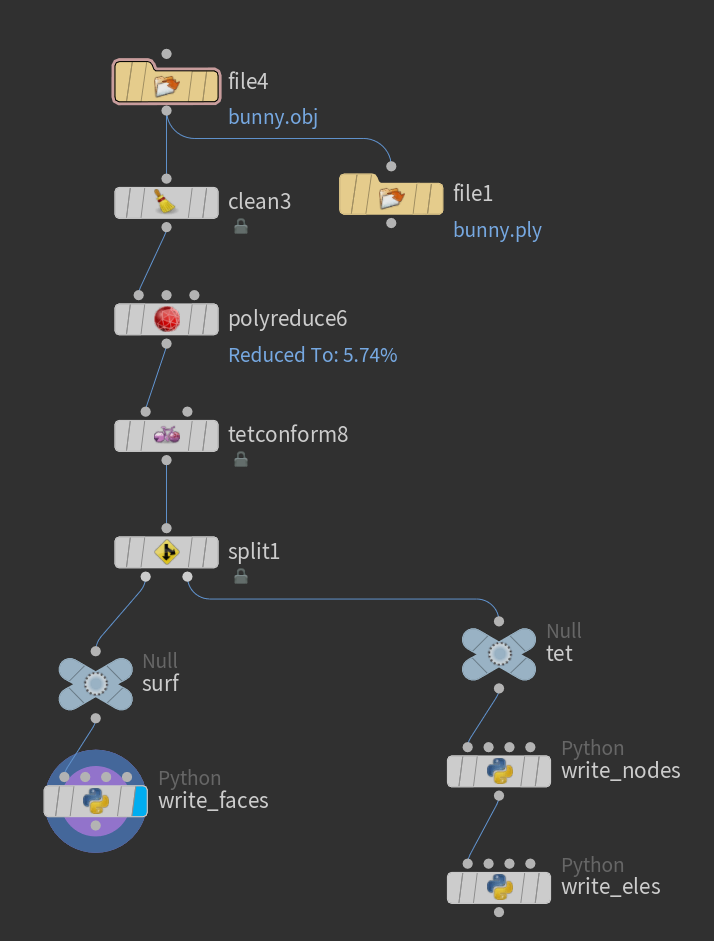
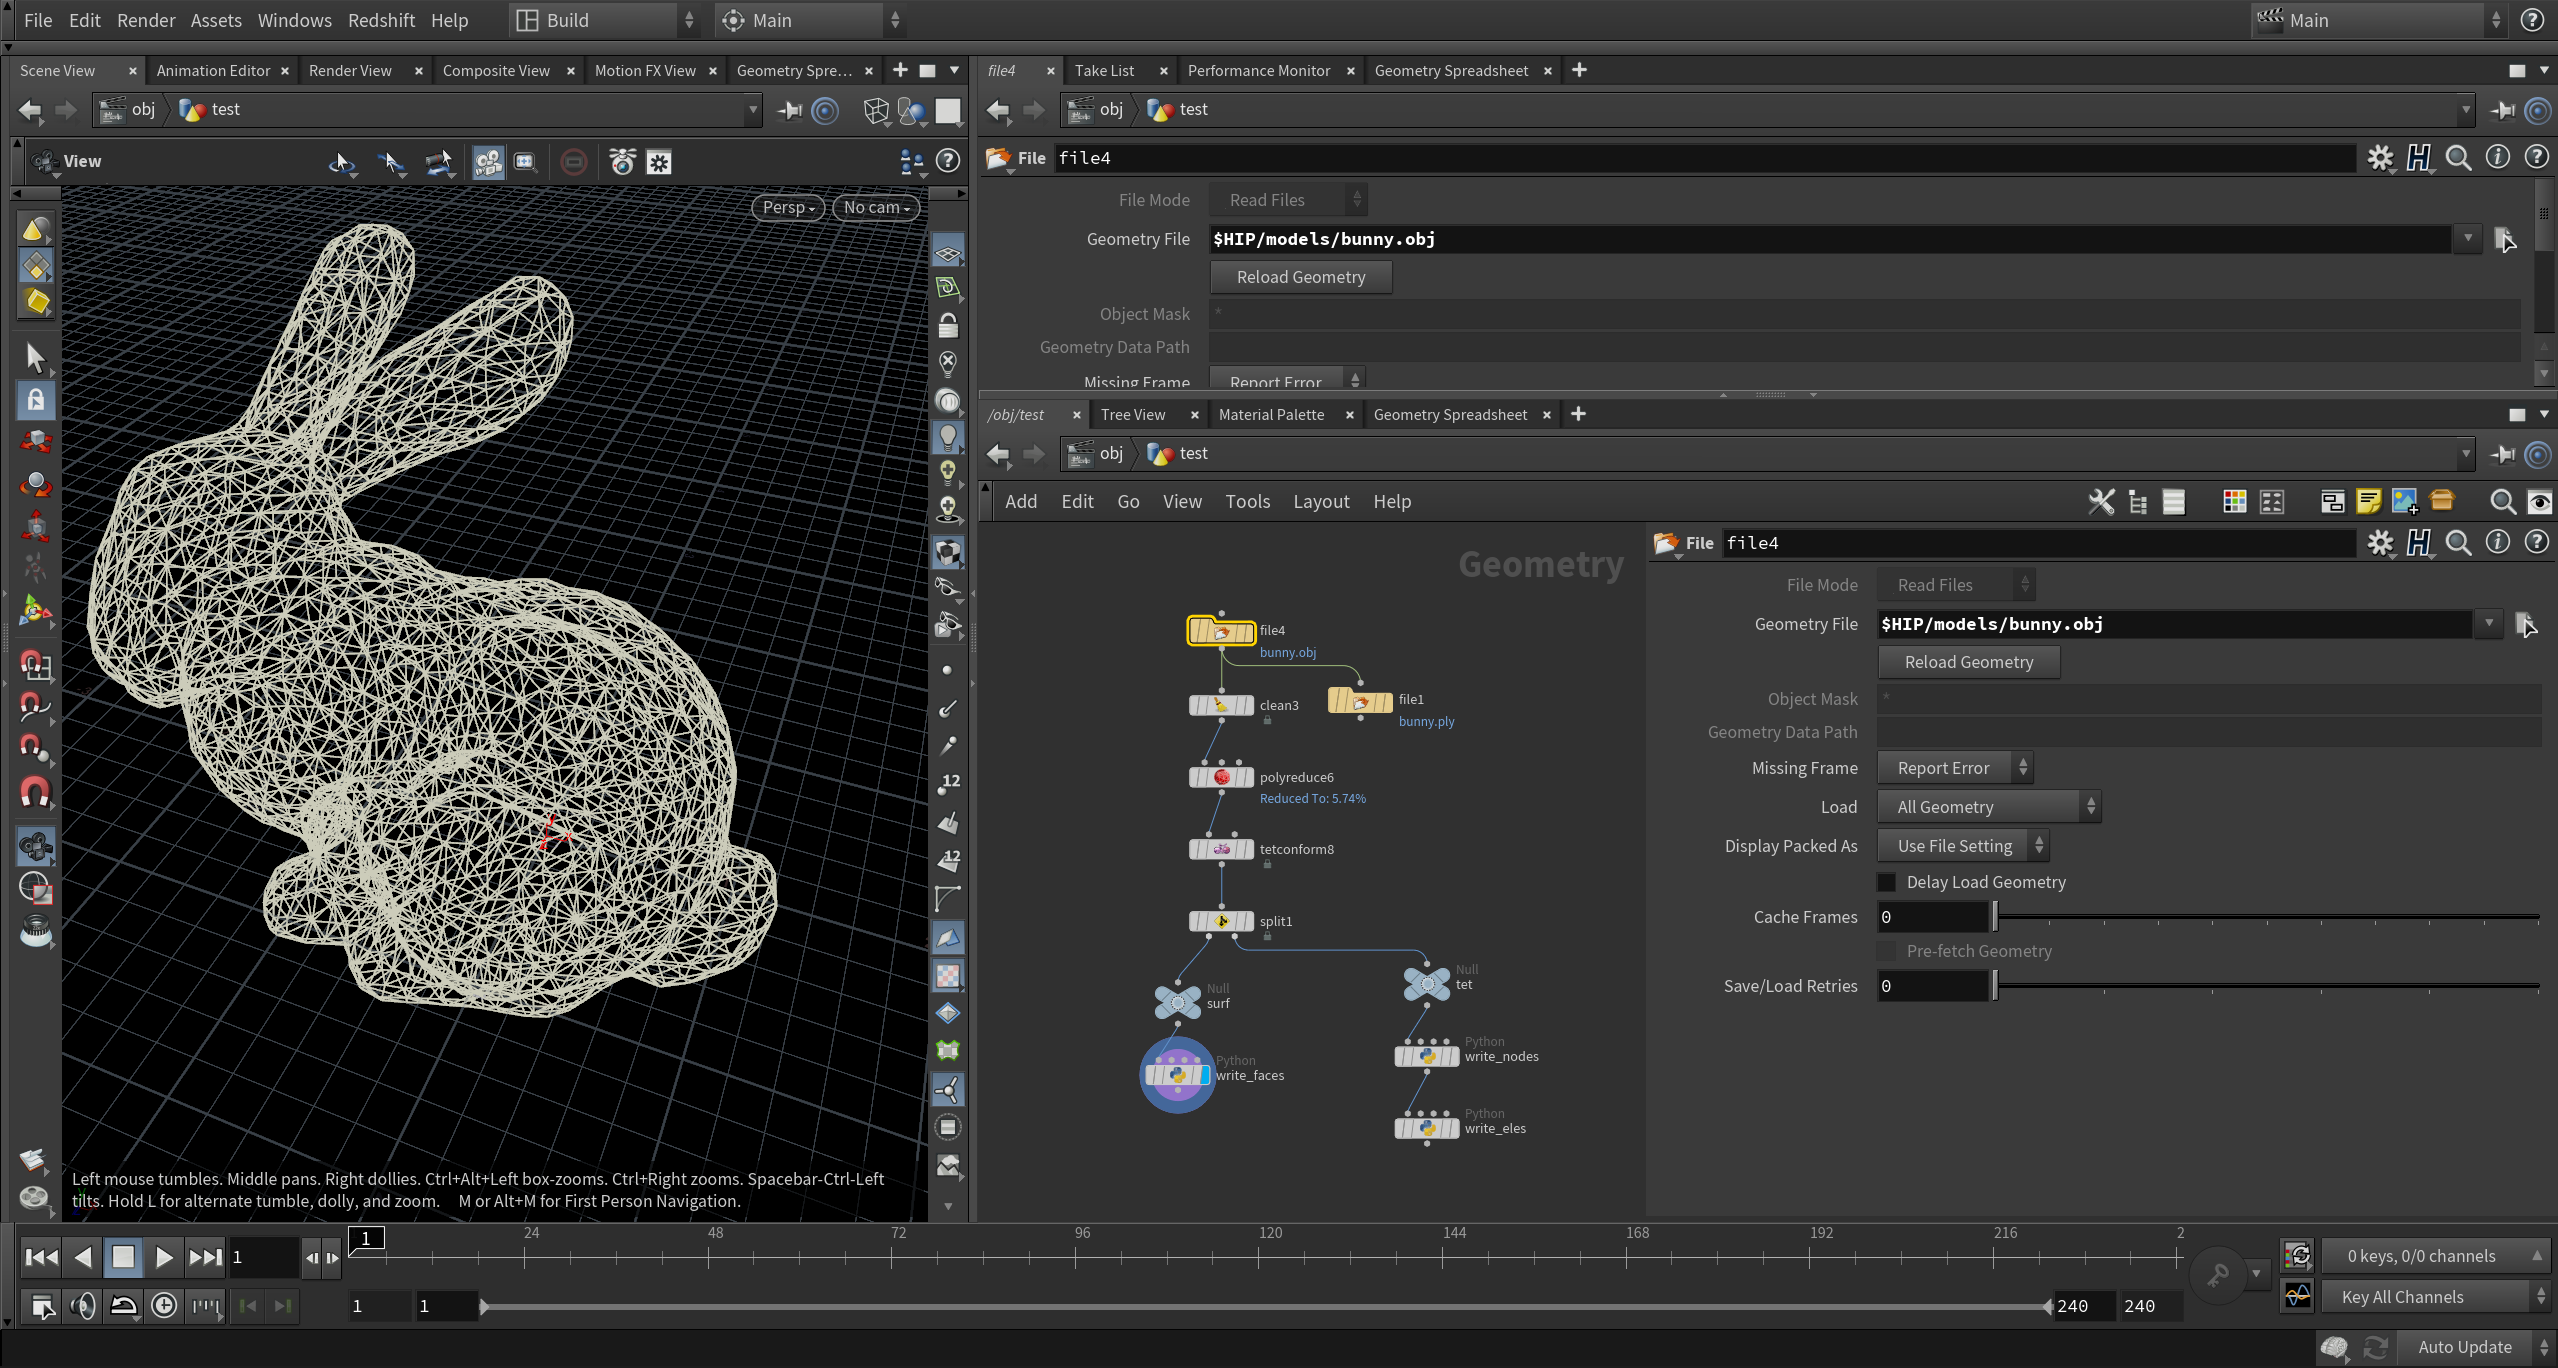
各个节点的作用如下所示:
- file: 读入obj
- clean: 清理多余信息(非必要)
- polyreduce: 简化模型,缩小顶点数(非必要)
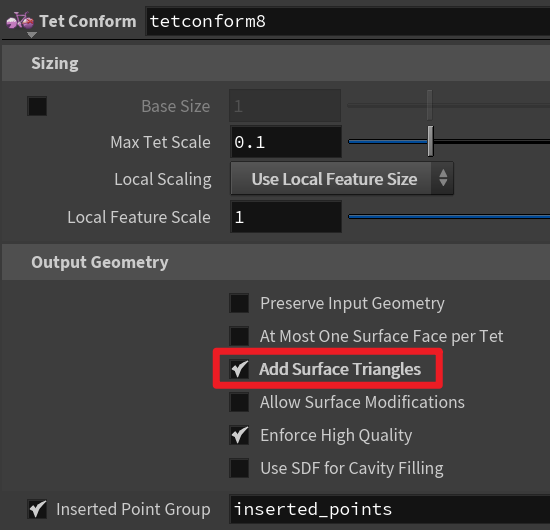
- tetconform: 生成四面体
- split: 分出表面三角形和四面体
- null:无作用的节点,只是为了占位
- python node(write_faces): 写出表面三角形编号
- python node(write_nodes):写出所有顶点位置
- python node(write_eles):写出四面体编号
脚本的内容在附录。
在这里,我们要讲解一下houdini中的数据。
分为四种:
- points 几何点的信息,包括点的位置
- vertices: 拓扑顶点信息。例如可以存顶点的编号
- primitives: 图元信息。可以存储例如该四面体的体积大小等
- detail: 整个几何体的信息。
一个常见的误区是混淆points和vertices。points完全是空间中真实存在的一个点。具有位置速度等信息。但是vertices可以认为是对顶点编号的reference。例如一个正方体的角点,可以被三个面同时共享。他都是同一个几何点,但是却有三个不同的vertices归属于不同的面。这样的好处是保证了唯一性:一个point只对应一个vertex,一个vertex只被一个primitive所包含。
这里要注意的是,vertices中存的是什么完全取决于图元是什么。假如是个四面体,就可以是四个顶点编号。假如是三角形,就是三角形三个点编号。
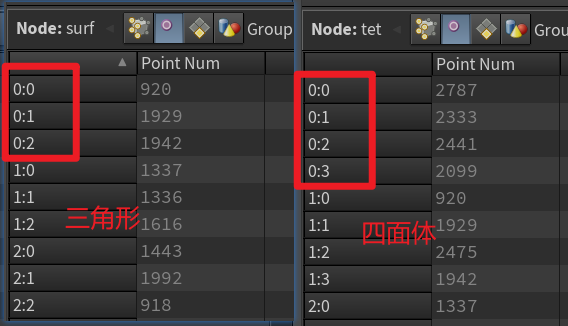
正是由于三角形与四面体都被存在primitive中,所以我们才用split将其分开。方面后面输出。
注意在tetconform中勾选add surface triangles才会输出三角面。
最后稍微讲解下python节点中的脚本。
请注意,houdini中的python是完全面向对象的,因此万物皆为对象。
我们仅以write_nodes为例。API请查阅Houdini的官方文档。
import hou # houdini包
geo = hou.pwd().geometry() #当前python节点的第一个输入端口所对应的对象,是个SOP对象
print(geo)

import os
path = hou.hipFile.path()  #hip文件所在的位置
path = os.path.dirname(path) + "/models/bunny2000_try.node"
print(f"path is {path}")

pts = geo.points() # 获取SOP对象上的point对象列表(是个list)
numpts = len(pts)
print("numpts:", numpts)

f = open(path, 'w')
f.write(str(numpts)+"  3  0  0\n")
for i in range(numpts):
    pt = pts[i]
    pos = pt.position() #获取point对象的position属性,就是位置
    f.write("   "+str(i)+"    "+str(pos[0])+"  "+str(pos[1])+"  "+str(pos[2])+"\n")
f.close()
完毕。
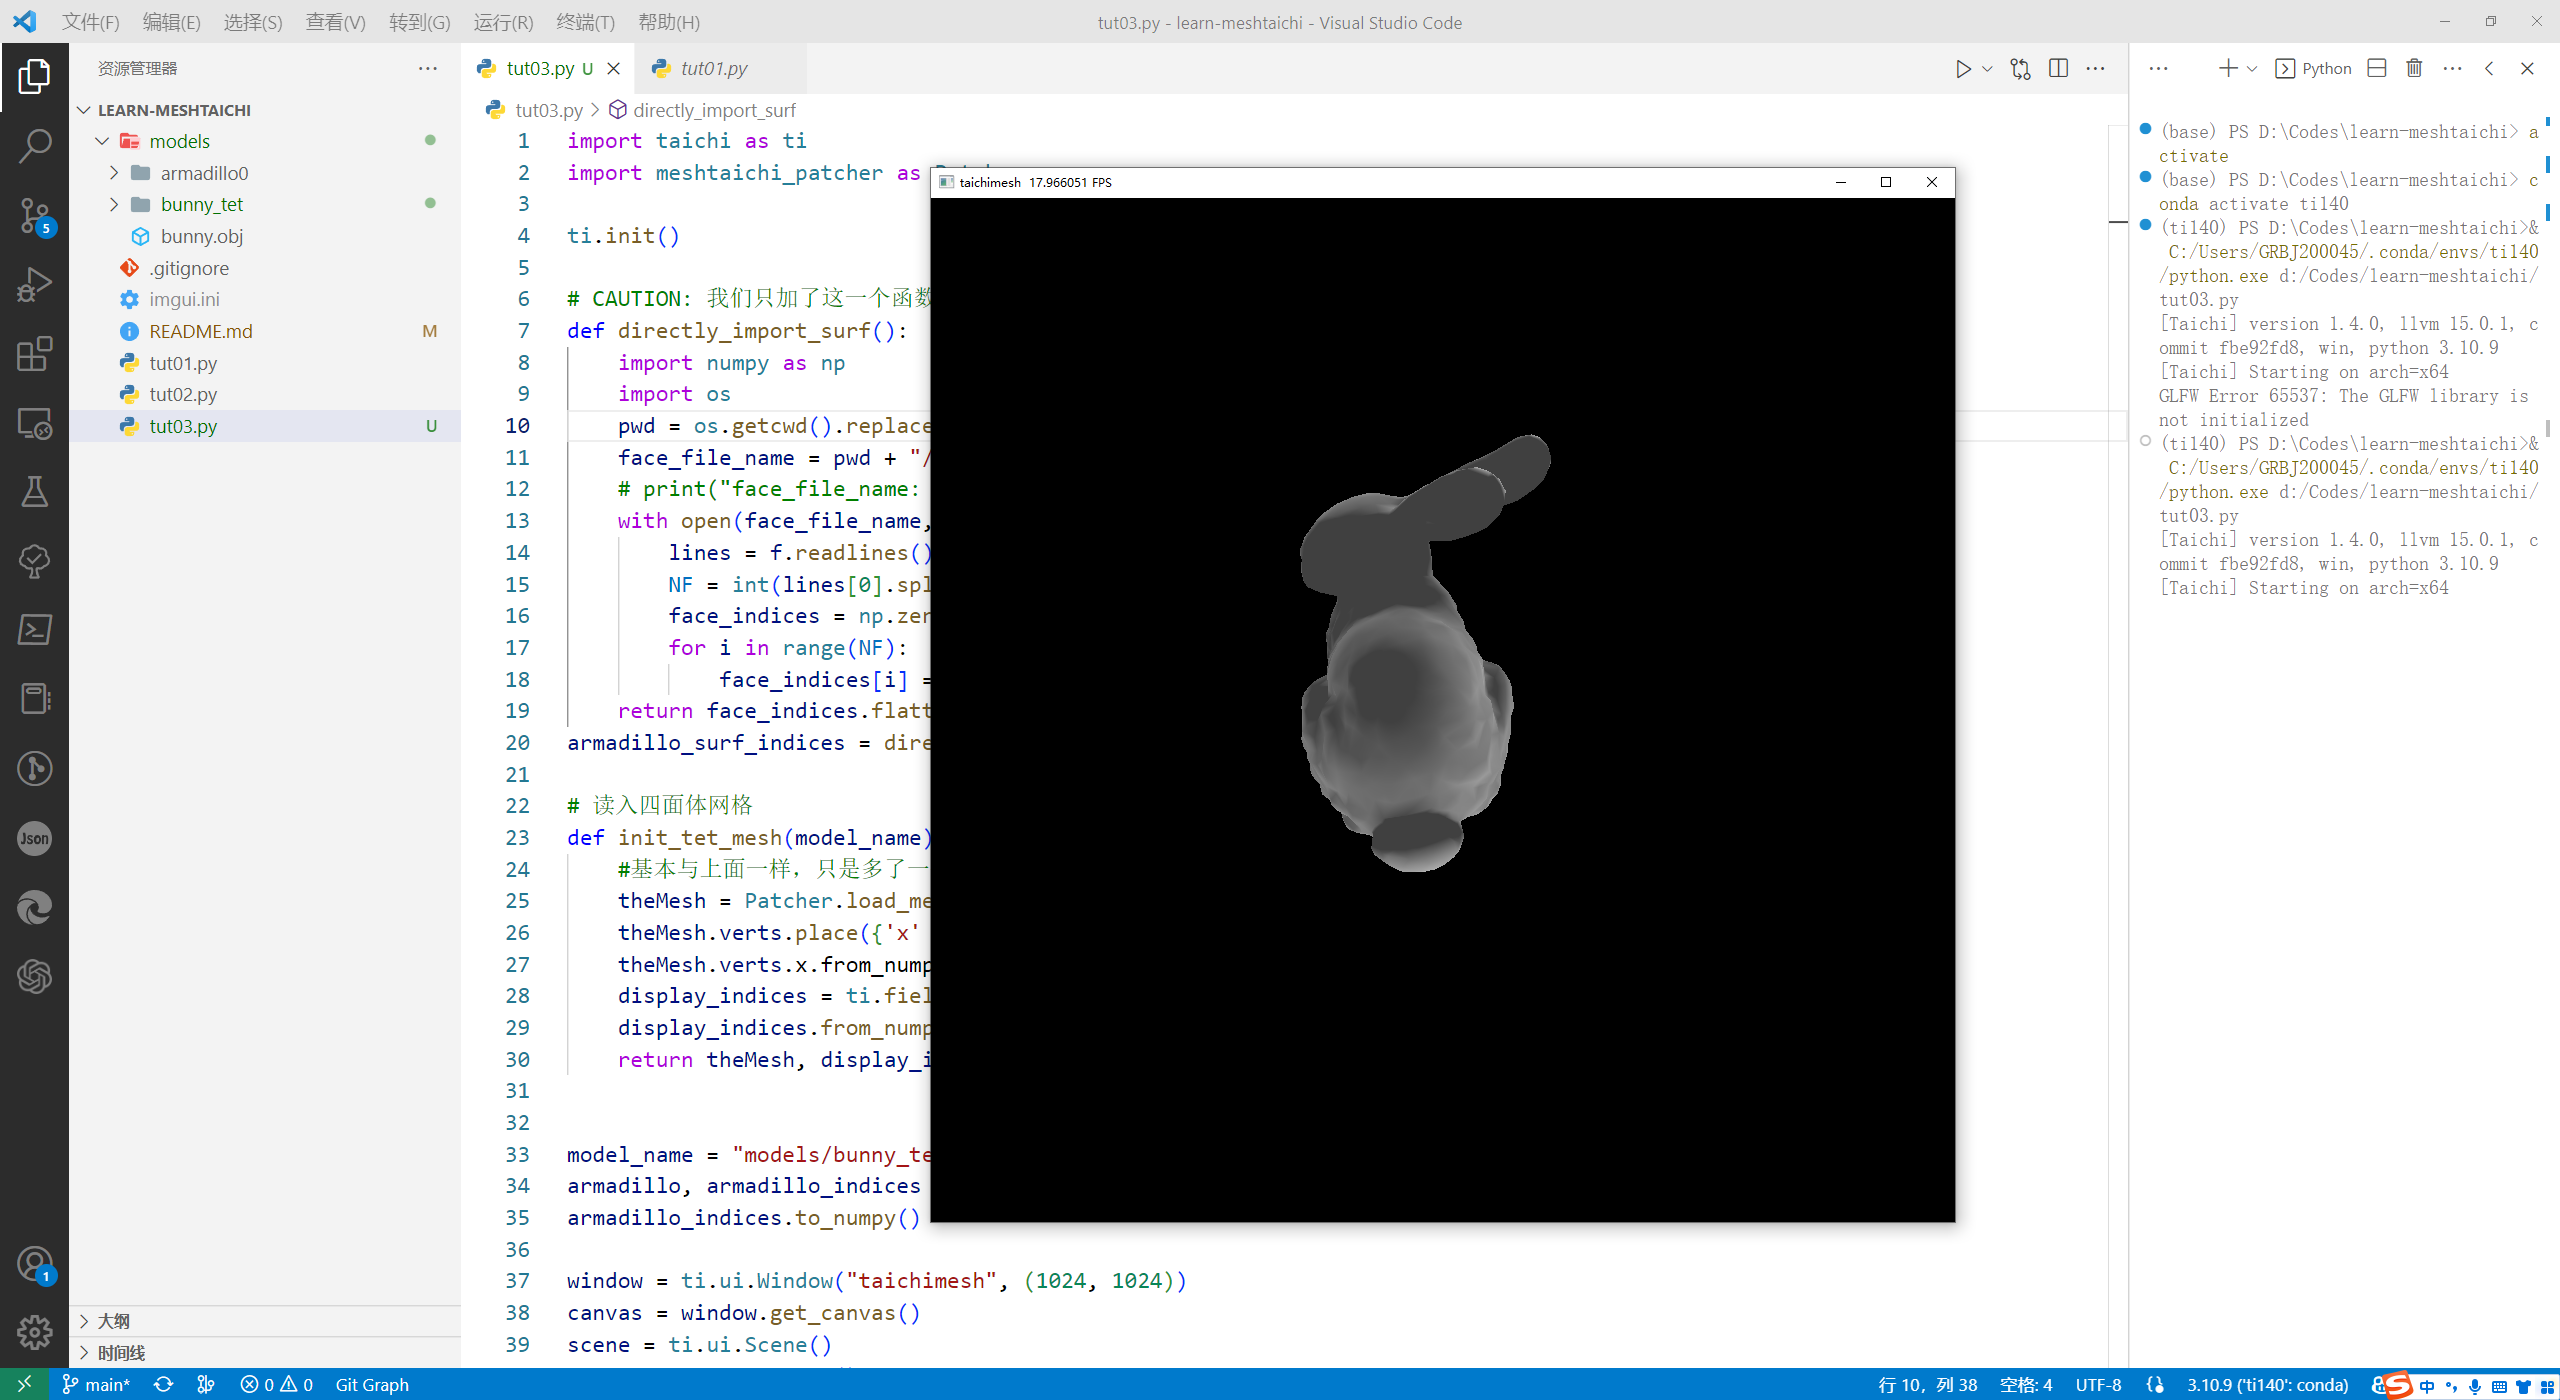
(非必要内容)在taichi中ggui显示
请见 https://github.com/chunleili/learn-meshtaichi 中的tut03
其中主要就是多写了directly_import_surf这个函数而已。
网格文件也请见这里。
结果如图
附录1:Houdini中python节点的脚本内容
write_faces
import hou
geo = hou.pwd().geometry()
print(geo)

import os
path = hou.hipFile.path()
path = os.path.dirname(path) + "/models/bunny2000_try.face"
print(f"path is {path}")


# write surface triangles
tris = geo.prims()
num_tris = len(tris)
f = open(path[:-4]+"face", 'w')
f.write(str(num_tris)+"  0\n")
for i in range(num_tris):
    tri = tris[i].points()
    f.write("   "+str(i)+"    "+str(tri[0].number())+" "+str(tri[1].number())+" "+str(tri[2].number())+ "  -1" +"\n")
f.close()
write_nodes
import hou
geo = hou.pwd().geometry()
print(geo)

import os
path = hou.hipFile.path()
path = os.path.dirname(path) + "/models/bunny2000_try.node"
print(f"path is {path}")

pts = geo.points()
numpts = len(pts)
print("numpts:", numpts)

f = open(path, 'w')
f.write(str(numpts)+"  3  0  0\n")
for i in range(numpts):
    pt = pts[i]
    pos = pt.position()
    f.write("   "+str(i)+"    "+str(pos[0])+"  "+str(pos[1])+"  "+str(pos[2])+"\n")
f.close()
write_eles
import hou
geo = hou.pwd().geometry()
print(geo)

import os
path = hou.hipFile.path()
path = os.path.dirname(path) + "/models/bunny2000_try.ele"
print(f"path is {path}")


eles = geo.prims()
num_eles = len(eles)
print("num_eles:", num_eles)
f1 = open(path[:-4]+".ele", 'w')
f1.write(str(num_eles)+"  4  0\n")
for i in range(num_eles):
    ele = eles[i].points()
    f1.write("   "+str(i)+"    "+str(ele[0].number())+"  "+str(ele[1].number())+"  "+str(ele[2].number())+"  "+str(ele[3].number())+"\n")
f1.close()
附录2: houdni的geo文件解析转换为tetgen格式四面体的脚本
import os
import json

def read_geo(from_path):
    with open(from_path,'r') as f:
        data=json.load(f)

    # 读取顶点个数等信息
    pointcount=data[5]  # 点个数
    vertexcount=data[7]
    primitivecount=data[9] # 四面体个数

    # 读取四面体的索引
    topology = data[13]
    pointref = topology[1]
    tet_indices = pointref[1]# 四面体的索引,是一个一维数组

    # 读取顶点的位置
    attributes = data[15]
    pointattributes = attributes[1]
    positions = pointattributes[0][1][7][5]

    return tet_indices,positions, pointcount,vertexcount,primitivecount


def write_tetgen(tet_indices,positions, pointcount, primitivecount,to_path, gen_face=False):
    # 写入tetgen的node文件(也就是顶点的位置)
    node_file = to_path+".node"
    if(os.path.exists(node_file)):
        print("remove file: "+node_file)
        os.remove(node_file)
    with open(node_file,'w') as f:
        f.write(str(pointcount)+"  3  0  0\n")
        for i in range(pointcount):
            f.write("   "+str(i)+"    "+str(positions[i][0])+"  "+str(positions[i][1])+"  "+str(positions[i][2])+"\n")

    # 写入tetgen的ele文件(也就是四面体的索引)
    ele_file = to_path+".ele"
    if(os.path.exists(ele_file)):
        print("remove file: "+ele_file)
        os.remove(ele_file)
    with open(ele_file,'w') as f:
        f.write(str(primitivecount)+"  4  0\n")
        for i in range(primitivecount):
            f.write("   "+str(i)+"    "+str(tet_indices[i*4])+"  "+str(tet_indices[i*4+1])+"  "+str(tet_indices[i*4+2])+"  "+str(tet_indices[i*4+3])+"\n")

    # 写入tetgen的face文件(也就是三角面的索引)
    face_file = to_path+".face"
    if(os.path.exists(face_file)):
        print("remove file: "+face_file)
        os.remove(face_file)

    if(gen_face):
        # 由于本身没有三角面,所以如果想生成face,就自己遍历一遍
        facecount = 0
        for i in range(primitivecount):
            facecount += 4
        with open(face_file,'w') as f:
            f.write(str(facecount)+" 0\n")
            face_i = 0
            for i in range(primitivecount):
                f.write("    "+str(face_i)+"    " + str(tet_indices[i*4])+"    "+str(tet_indices[i*4+2])+"    "+str(tet_indices[i*4+1])+"  -1\n")
                face_i += 1
                f.write("    "+str(face_i)+"    " + str(tet_indices[i*4])+"    "+str(tet_indices[i*4+3])+"    "+str(tet_indices[i*4+2])+"  -1\n")
                face_i += 1
                f.write("    "+str(face_i)+"    " + str(tet_indices[i*4])+"    "+str(tet_indices[i*4+1])+"    "+str(tet_indices[i*4+3])+"  -1\n")
                face_i += 1
                f.write("    "+str(face_i)+"    " + str(tet_indices[i*4+1])+"    "+str(tet_indices[i*4+2])+"    "+str(tet_indices[i*4+3])+"  -1\n")
                face_i += 1

    print("\n\nwrite tetgen file success! \nnode file: "+node_file+"\nele file: "+ele_file)


if __name__ == '__main__':
    from_path="models/bunny1000_dilate/bunny1000_dilate.geo"
    to_path=from_path[:-4]

    tet_indices,positions, pointcount,vertexcount,primitivecount = read_geo(from_path)

    write_tetgen(tet_indices,positions, pointcount,primitivecount,to_path, gen_face=True)
附录3:在太极ggui中显示
learn-meshtaichi tut03
import taichi as ti
import meshtaichi_patcher as Patcher

ti.init()

# CAUTION: 我们只加了这一个函数, 其他的基本不变。这个就是用来读取face文件的
def directly_import_surf():
    import numpy as np
    import os
    pwd = os.getcwd().replace("\\", "/")
    face_file_name = pwd + "/models/bunny_tet/bunny_tet.face"
    # print("face_file_name: ", face_file_name)
    with open(face_file_name, 'r') as f:
        lines = f.readlines()
        NF = int(lines[0].split()[0])
        face_indices = np.zeros((NF, 3), dtype=np.int32)
        for i in range(NF):
            face_indices[i] = np.array(lines[i + 1].split()[1:-1], dtype=np.int32)
    return face_indices.flatten()
armadillo_surf_indices = directly_import_surf()

# 读入四面体网格
def init_tet_mesh(model_name):
    #基本与上面一样,只是多了一个CV关系,表示通过一个cell可以找到它的四个顶点
    theMesh = Patcher.load_mesh(model_name, relations=["CV"])
    theMesh.verts.place({'x' : ti.math.vec3})
    theMesh.verts.x.from_numpy(theMesh.get_position_as_numpy())
    display_indices = ti.field(ti.u32, shape = len(armadillo_surf_indices))
    display_indices.from_numpy(armadillo_surf_indices) #这里直接读入了face文件
    return theMesh, display_indices


model_name = "models/bunny_tet/bunny_tet.node"
armadillo, armadillo_indices = init_tet_mesh(model_name)
armadillo_indices.to_numpy()

window = ti.ui.Window("taichimesh", (1024, 1024))
canvas = window.get_canvas()
scene = ti.ui.Scene()
camera = ti.ui.Camera()
camera.up(0, 1, 0)
camera.fov(75)
camera.position(4.5,4.5,0.6)
camera.lookat(3.8, 3.8, 0.5)
camera.fov(75)

frame = 0
paused = ti.field(int, shape=())
paused[None] = 1
while window.running:
    # 用下面这段代码,通过提前设置一个paused变量,我们就可以在运行的时候按空格暂停和继续了!
    for e in window.get_events(ti.ui.PRESS):
        if e.key == ti.ui.SPACE:
            paused[None] = not paused[None]
            print("paused:", paused[None])
    if not paused[None]:
        # substep()
        print(f"frame: {frame}")
        frame += 1
    # 我们可以通过下面的代码来查看相机的位置和lookat,这样我们就能知道怎么调整相机的位置了
    # print("camera.curr_position",camera.curr_position)
    # print("camera.curr_lookat",camera.curr_lookat)

    # movement_speed=0.05表示移动速度,hold_key=ti.ui.RMB表示按住右键可以移动视角
    # wasdqe可以移动相机
    camera.track_user_inputs(window, movement_speed=0.05, hold_key=ti.ui.RMB)
    scene.set_camera(camera)

    scene.mesh(armadillo.verts.x, armadillo_indices, color = (0.5,0.5,0.5))

    scene.point_light(pos=(0.5, 1.5, 0.5), color=(1, 1, 1))
    scene.ambient_light((0.5,0.5,0.5))

    canvas.scene(scene)

    window.show()